 FAQ Project. |
The Quick & Dirty 124 |
Alternate Title:
Understand your 124's Front end, and avoid being
Killed, Maimed, or Suffering unneccesary Damage to your
steed.
FAQ Project. |
The Quick & Dirty 124 |
Alternate Title:
Understand your 124's Front end, and avoid being
Killed, Maimed, or Suffering unneccesary Damage to your
steed.
The 124 Spider was designed in the mid-60's- Like most Italian cars of the period, it was also designed to be durable & reliable for the period of time that most European cars of the day stayed on the road (about 75-100,000 miles).
These facts are important when you look at the 124 in comparison to later designs. The Worm & Ball roller steering box, multiple ball joints/tie rods, and the general fragility of the 124 front end after 15+ years and multiple miles are the problems we contend with.
Even if the technology was widely available, or easily implemented at the time, a Mcpherson Strut front end like the simple, durable designs we saw on later Fiat models would have been difficult with the 124. So, they used proven Suspension design that also allowed the low, sexy looks the model possesses.
Multiple Joints: The 124 Front Suspension uses: (8) Control Arm Bushings, (4) Ball Joints, (4) Tie Rod Ends, (1) Center Link (with two tie-rod type ball joints installed), (1) Steering Box, and (1) Idler.
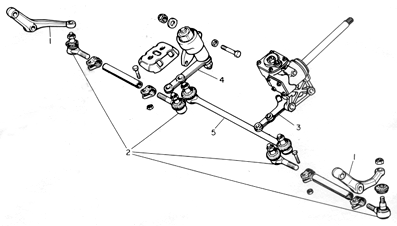
The Upper & Lower Ball Joints are the flexible joint that secures the knuckle to the control arms. These too last a long time, but most were 'sealed for life' joints with no provision for greasing, and so after 60-100,000 miles get dry & worn. Torn grease boots accelerate this wear. The Lowers receive much harsher treatment than the uppers, and tend to wear out first.
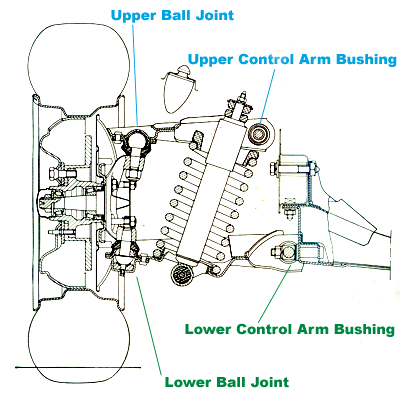
When Ball joints get worn, they cause camber problems, and a general numbness in the steering. If the wear gets severe, they can actually separate & cause an accident. Picture a 124 with a front tire lying horizontally on the ground, and check those joints right away!
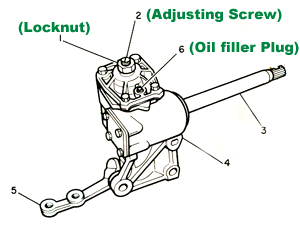
Play in the steering of a 124 is pretty common. The best way to check
multiple items is to jack the car up, and place it on secure stands.
Have an assistant gently wag the steering wheel back & forth (just
taking up the play, not actually moving the tires) and crawl under the
car. Look at the steering box first. Is the arm moving as your
assistant moves the wheel? If not, your steering box is loose &
needs adjustment. Center the steering wheel, loosen the exposed locknut
on the top of the box (can be a bear to get to on late carbureted
cars), and slowly tighten the screw. Only tighten the box enough to
take up the play, and then stop- (don't forget to tighten the locknut
back down)
Overtightening will shorten the life of your steering box. Also note that you are only trying to take up slack
when the wheels are centered. Play when the wheels are at one lock or another is
normal!
While you are at it, it might be a good idea to check and refill the Oil
Filler Plug with SAE 90 EP oil.
The most common symptom of idler failure is that they get stiff over time. I've seen a few severe cases where the idler got loose from it's mounting bolts, but that is pretty rare. I'll post a future document listing potential idler problems, and how to fix them.
Wheel bearings also tend to wear & get loose over time. Remove the hubs, inspect the bearings, and either replace/repack them as necessary. Dave should have some information about this in his section as well.
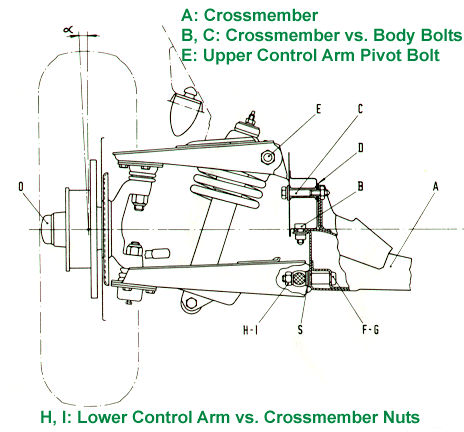
The Front Crossmember:
This single item has been the death of many Spiders, and has also injured a few negligent 124 Pilots as well.
The front crossmember does a lot of things in a 124. It is the rigid link between the front 'frame rails', supports the Engine, and provides the mounting point for the lower control arms. Here are two common points of failure: One version of this is when the mounting points for the lower control arms crack, and start to come free of the crossmember. The metal here is not as strong as it really needs to be now that these cars are 15+ years old, and needs reinforcement.
Another version is when the crossmember bolts that secure it to the 'frame rails' get loose, and the crossmember actually starts to tear a hole in the rail's box structure. Both are severe, and need attention immediately if you are to avoid more severe damage or an accident.
| Fastener: | Reference: | Thread(Metric): | Torque Spec: |
| Wheel Studs | Obvious | M12 x 1.25 | 86 N-m, 65 FT/LB, 9.0 Kgm |
| Crossmember to side member Bolt | Fig. 4, Item C | M12 x 1.25 | 56 N-m, 69 FT/LB, 9.5 Kgm |
| Crossmember to side member Lower Nut | Fig. 3 | M10 x 1.25 | 59 N-m, 40 FT/LB, 5.5 Kgm |
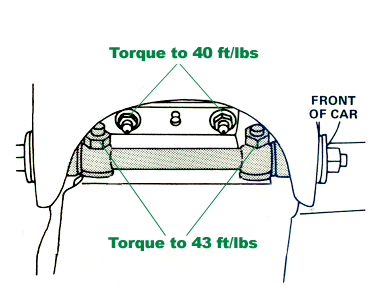
| Lower Control Arm to Crossmember nut | Fig. 3, Fig 4 Item H,I | M12 x 1.25 | 59 N-m, 43 FT/LB, 6.0 Kgm |
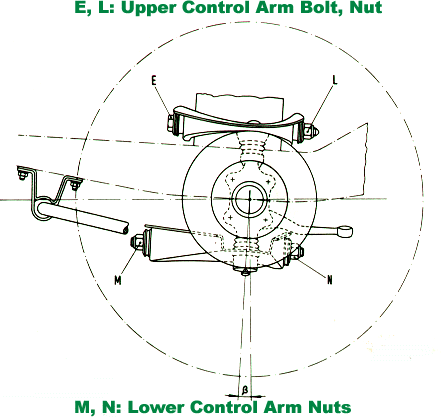
| Lower Control Arm to Pivot-Bar Nut | Fig. 5 | M14 x 1.5 | 98 N-m, 72 FT/LB, 10 Kgm |
| Upper Control Arm Nut | Fig. 5 | M14 x 1.5 | 88 N-m, 65 FT/LB, 9 Kgm |
Follow the Torque table, and check 'em out for every oil change. If you see
that parts are getting loose at every Maintenence Period, or your fasteners
are rounding off/getting weak as you torque them...
Become Nervous, and then start looking seriously at your Front End.
If your crossmember is getting weak, has broken, or you just have the engine out & want to reinforce your car (bravo!), you have a few options. The area where the lower control arms mount can be welded/reinforced by a good welder (hopefully, he's done this before) with additional structure for safety. If you live in an area with no local experience, let me know. I might post an article describing the procedure. Likewise, the frame rails (sometimes the bolts that come out of the Frame Rails [see Fig 3] get weak or break) can be reinforced with 'fish plates' behind the damaged area and longer fasteners. New crossmembers are expensive but available, but I'd reinforce even them before installing one. This too deserves a separate article, please contact me if you need information in the meantime.
*Note: I've seen some very strange things, some very strange attempts to repair the 124 crossmember. In one case, a customer had WELDED the crossmember to the frame rails. Worked great until one of the studs that mount the lower control arms got damaged… With no way to safely R&R the crossmember, a nice '77 with recent bodywork had to go to the crusher.
Do it right the first time, don't cheat!
Finally, it has been brought to my attention lately that another possible weakness in 124 models has a fix. Dan F. found that the body above the shock towers in his '78 was starting to buckle, and that the frame rails were sagging slightly. Dan has owned a lot of Spiders, and he says that this happens to high-mileage cars regardless of their accident history. Dan implemented a repair, and has run it in his cars for 2 years or more without problems. Basically, he uses a piece of angle iron to reinforce the frame rail, and fabricates steel plates to go on the inside of the engine bay. Long fasteners sandwich this material together.
Dan has agreed to draw the plates, or fabricate a set for those that might need them. Let me know, and I'll forward your inquiries to him (he does not have an email account).
As stated before, this is only the first of a series of articles. Please mail your input, and watch this area for updates!