 FAQ Project. |
Replacing the Sway Bar Bushings by "Brian Burke" bburke@wowway.com |
Replacing the sway bar bushings is relatively straightforward, but there here are a few hints.
END BUSHINGS
The end bushings are a no-brainer, so I won’t even bother covering it.
CENTER BUSHINGS
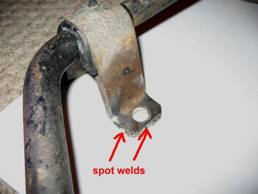
The center bushings are just a little tricky. Each bushing is sandwiched between 2 brackets. The brackets are kind of “riveted” together through the mounting holes. Sort of like a hollow rivet. To get them apart you will need to drill out the rivets. Then you can separate the bracket halves and slide off the old bushing.
Slide on a new bushing. Now the trick is to get the brackets back on. I’ll tell you right now that you better have them tack-welded into place, otherwise installation will be a big pain. Use some vise grips to squeeze them together, then tack-weld them in a few spots. Take your time and get them lined up real good before tack-welding. Here is a picture:
Take care not to heat the bracket too much because the rubber bushing is not far away.
With the brackets tack-welded together, installation will now be much much easier.

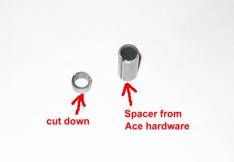 Remember when you drilled out the rivets? You are now left with the mounting
holes way too big. There will be a
lot of slop when mounting the sway bar back on. To take up the slop, I inserted some sleeves into the
mounting holes. I got the sleeves
from Ace hardware. They had a
variety of diameters. Actually
they are really called “roll pins”.
Here are some pictures:
Remember when you drilled out the rivets? You are now left with the mounting
holes way too big. There will be a
lot of slop when mounting the sway bar back on. To take up the slop, I inserted some sleeves into the
mounting holes. I got the sleeves
from Ace hardware. They had a
variety of diameters. Actually
they are really called “roll pins”.
Here are some pictures:
I cut the sleeve with a hacksaw, then used a bench grinder to finish it up. Fits really nice and no slop! You do not need to weld or glue the sleeve, just insert it when you are mounting the sway bar.
That’s it!