
FAQ
Project.
"Just Click"
by
Dan Joel eMail dan@saaborama.com
by
Dan Joel eMail dan@saaborama.com
FAQ Project. |
"Just Click" by Dan Joel eMail dan@saaborama.com |
8-24-03 work in progress rev 11.51
This page was created to help locate electrical problems in the starter circuit, and avoid erroneous replacement of the starter or ignition switch.
there are many links repeated to the same images, this is annoying and I apologize in advance.
this trouble shooter is far from perfect, and may not be in the most efficient order. but this is how I would start:
assumptions:
notes:
first things first:
- confirm that the car is NOT in gear.
- measure the voltage across both battery posts while the key is in the crank position. if you measure less than 10 volts (and dropping) either the battery is not properly charged or may need service or replacement. confirm the battery is valid before continuing.
- listen for the click at the starter.
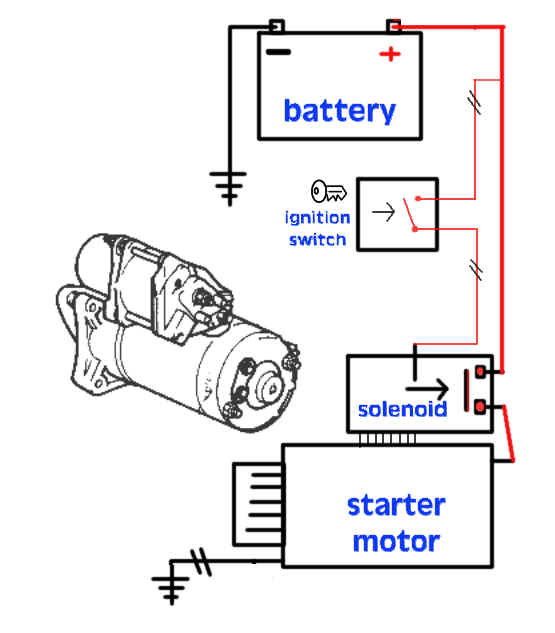
If you get ONE nice, solid click out of the starter each time you turn the key you can (for the time) assume that the circuit that begins at your battery, goes through wires, connections, the ignition switch then more wire and connections is correct and complete. (small red trace in figure above). the click you hear is the mechanical action inside the solenoid that completes the circuit that powers the starter motor. the solenoid will either click (pull) or not. there is no electrical gray area here. note that this does not mean that the contacts inside the solenoid are intact. more on this in a moment.
If the click is more of a chatter, rather than one nice click, the above does not necessarily apply to you.I'll separate the following tests into two sections- with and without click. treat chatter as if without click.
WITH CLICK:
assuming your battery is OK, your problem (or voltage drop) is one of the following-
bad main battery cables or terminal ends including earth cable(s), connections at battery, bad solenoid contacts, or actual starter motor.test power to starter-
place one of your test lead probes on the stud (A) on the solenoid that your positive battery cable attaches to and the other probe to bare metal on the engine block or cylinder head. have your helper turn the key and read off the measurement. note that when the key is not in the crank position you will read battery voltage on your volt meter. ~12.6 volts. this is of little help and should be ignored for the time.-roughly 10.5 volts or so- your cables and ends are fine and you may suspect the contacts in the solenoid next. to test them leave one test probe on the block and place the probe that you had on the solenoid stud with the battery cable to the other stud (B) just below the first one. there will be a heavy wire attached to this stud that goes into the starter motor body. turn the key again and read off the measurement. if you have a very low voltage reading here there is a good chance at this point that the solenoid contacts have failed. if you have the same reading, about 10 volts, than the starter motor must be repaired or replaced.
-less than ~10 volts- you have a voltage drop and fun begins. first the positive, it's easier. place one test probe on the + positive battery post and the other at the stud on the solenoid (A) that the battery cable attaches to. yes your test probes are at either end of the same wire. now turn the key to crank. a measurement above 1 volt is not satisfactory, it may not be THE problem, but should be corrected before continuing. to pin point the bad section simply place the test probes at any two points along the + positive path. start with the center of the battery post, and 2 inches away where the bare wire slips into the battery terminal end. one tenth (0.10) of a volt is acceptable per connection. any higher than that (under load, which is to say while the key is held in the crank position) and the connection should be cleaned or repaired. poke around and make corrections until you have under 1 volt from the battery(+) all the way to the solenoid (A).
testing the ground path is basically the same with a few exceptions. there is no negative wire for the starter, it gets its ground from being bolted up, and relies on a good ground from the battery to the engine or transmission. cars with remote mounted batteries often have no negative cable directly to the engine or transmission. they use one cable from the battery to a point on the frame, and then another cable from the frame to the engine / transmission. both cables and all connections should be scrutinized. this method of grounding is not optimum. a piggy back, large gauge cable can be added with minimal effort.
to test the ground path start with one probe on the negative post on the battery, and the other probe on bare metal at the engine block or cylinder head. if you have already tested and repaired your positive cable the odds are that you'll measure more than 2 volts while the key is in the crank position. use the same method as above to pin point the trouble section.NO CLICK:
First make sure you have battery voltage at solenoid (a), see 'test power to starter' . make sure the smaller lead on the solenoid (C) is firmly attached and in good condition. leave it attached while you make any / all measurements, this is critical. place one test probe on the engine block or cylinder head, the other test probe on the small lead at the solenoid (C). if you measure above 10 volts while the key is held in the crank position than the solenoid windings have failed and the entire solenoid / starter must be repaired or replaced.
if you read under 10 volts than you have two likely possibilities. one is that the ground path for your starter circuit is not complete (see testing the ground path above), or your 'ignition switch' circuit including the famed 'brown wire', the ignition switch and all the cables and connections (red dots) involved must be tested. if an alarm has been installed, make sure to consider it and any relevant connections.why not start at the switch. find the lead that brings power into the switch (pin 30). place one probe at this point and the other at the engine block. crank it. less than 10 volts here and you need to start testing upstream. 10 volts or more means the switch may be suspect. leave the probe at the same point on the switch and take the probe from the engine block and place it on the lead from the back of the switch to the solenoid (pin 50). a measurement of 1 volt or more indicates the ignition switch has failed and must be repaired or replaced. less than 1 volt means the problem is between the switch and the solenoid. check and clean any connections you find.
footnotes:
* cars with automatic transmission have a 'neutral safety switch', power from
the ignition switch to the starter solenoid trigger will only flow when in Park
or Neutral, assuming the switch is in good working order.
** many analog volt meters require that the positive and negative test leads are connected to the appropriate (+/-) points in the circuit. when measuring for drops on the same path keep the positive test probe closest to the positive post at the battery.
Image list: (will open in new window. all images from links above)
pleases direct all corrections and comments to: dan joel dan@saaborama.com 831-239-5662