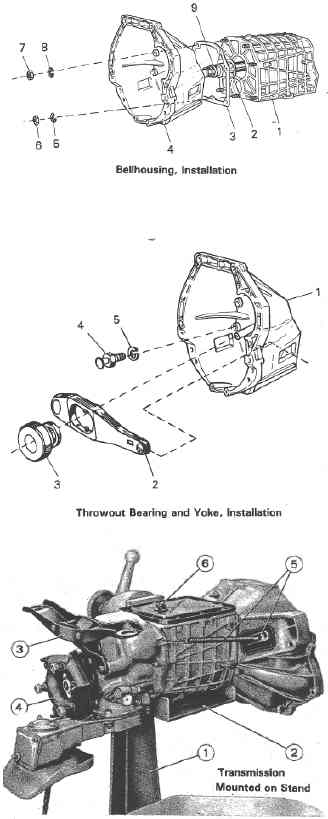
| Install Bellhousing a. If removed, install new seal (9) in bellhousing (4). b. Assembie new gasket (3) on. case (1). c. Coat spring washer (2) with heavy grease. With cup end forward, place on seal in bellhousing. d. Assemble bellh ousing (4), six lockwashers (8), nuts (7), and one lockwasher (5) and nut (6). e. Tighten nuts (7) to 36 lb ft torque and nut (6) to 18 lb ft torque. |
 |
|
| 1. Case 2. Spring washer 3. Gasket 4. Bellhousing 5. Lockwasher |
6. Nut 7. Nut S. Lockwasher 9. Seal |
|
| Install Yoke and Throwout
Bearing a. If removed, assemble lockwasher (5) and pivot (4) to bellhousing (1). b. Insert throwout bearing (3) into yoke (2). c. Insert return spring end of yoke (2) into opening in bellhousing (1) and throwout bearing (3) over input shaft. d. Slide yoke (2) over pivot (4) until locked in place. |
||
| 1. Bellhousing 2. Yoke 3. Throwout bearing |
4. Pivot 5. Lockwasher |
|
| Install Oil Plugs a. Assemble return spring and rubber boot (5). b. Using two nuts and washers, attach rear supporting cross strut (3) to rear housing. c. Using three self-locking nuts and bolts, attach flexible joint (4) to yoke. d. Using tools A.5011 3 and A.55087, install oil drain plug (6) and rear housing oil drain plug. Loosely install oil level plugs until transmission is filled with oil. e. After transmission is car installed, add 1 % quarts of SAE 90 oil containing antiwear additives. Do not use EP oil. |
||
| 1. Rotating
stand 2. Support 3. Rear supporting cross strut |
4. Flexible
joint 5. Spring and rubber boot 6. Oil drain plug |
|